Microsoft Dynamics 365 Business Central
The Workist Integrator is an app for Microsoft Dynamics 365 Business Central that connects your Business Central system to the Workist platform. It synchronizes the necessary master data from Business Central to Workist and automatically creates completed documents — for example sales orders — in Business Central.
It moves from a general overview through installation and configuration to operation, troubleshooting, and a technical reference.
Overview
The Workist Integrator is installed as a per-tenant extension (PTE) in your Business Central environment. It fulfills two main tasks:
- Send master data from Business Central to Workist so that Workist can read and match your documents correctly.
- Create completed documents from Workist in Business Central — such as sales orders — and report the created document number back to Workist.
How it works
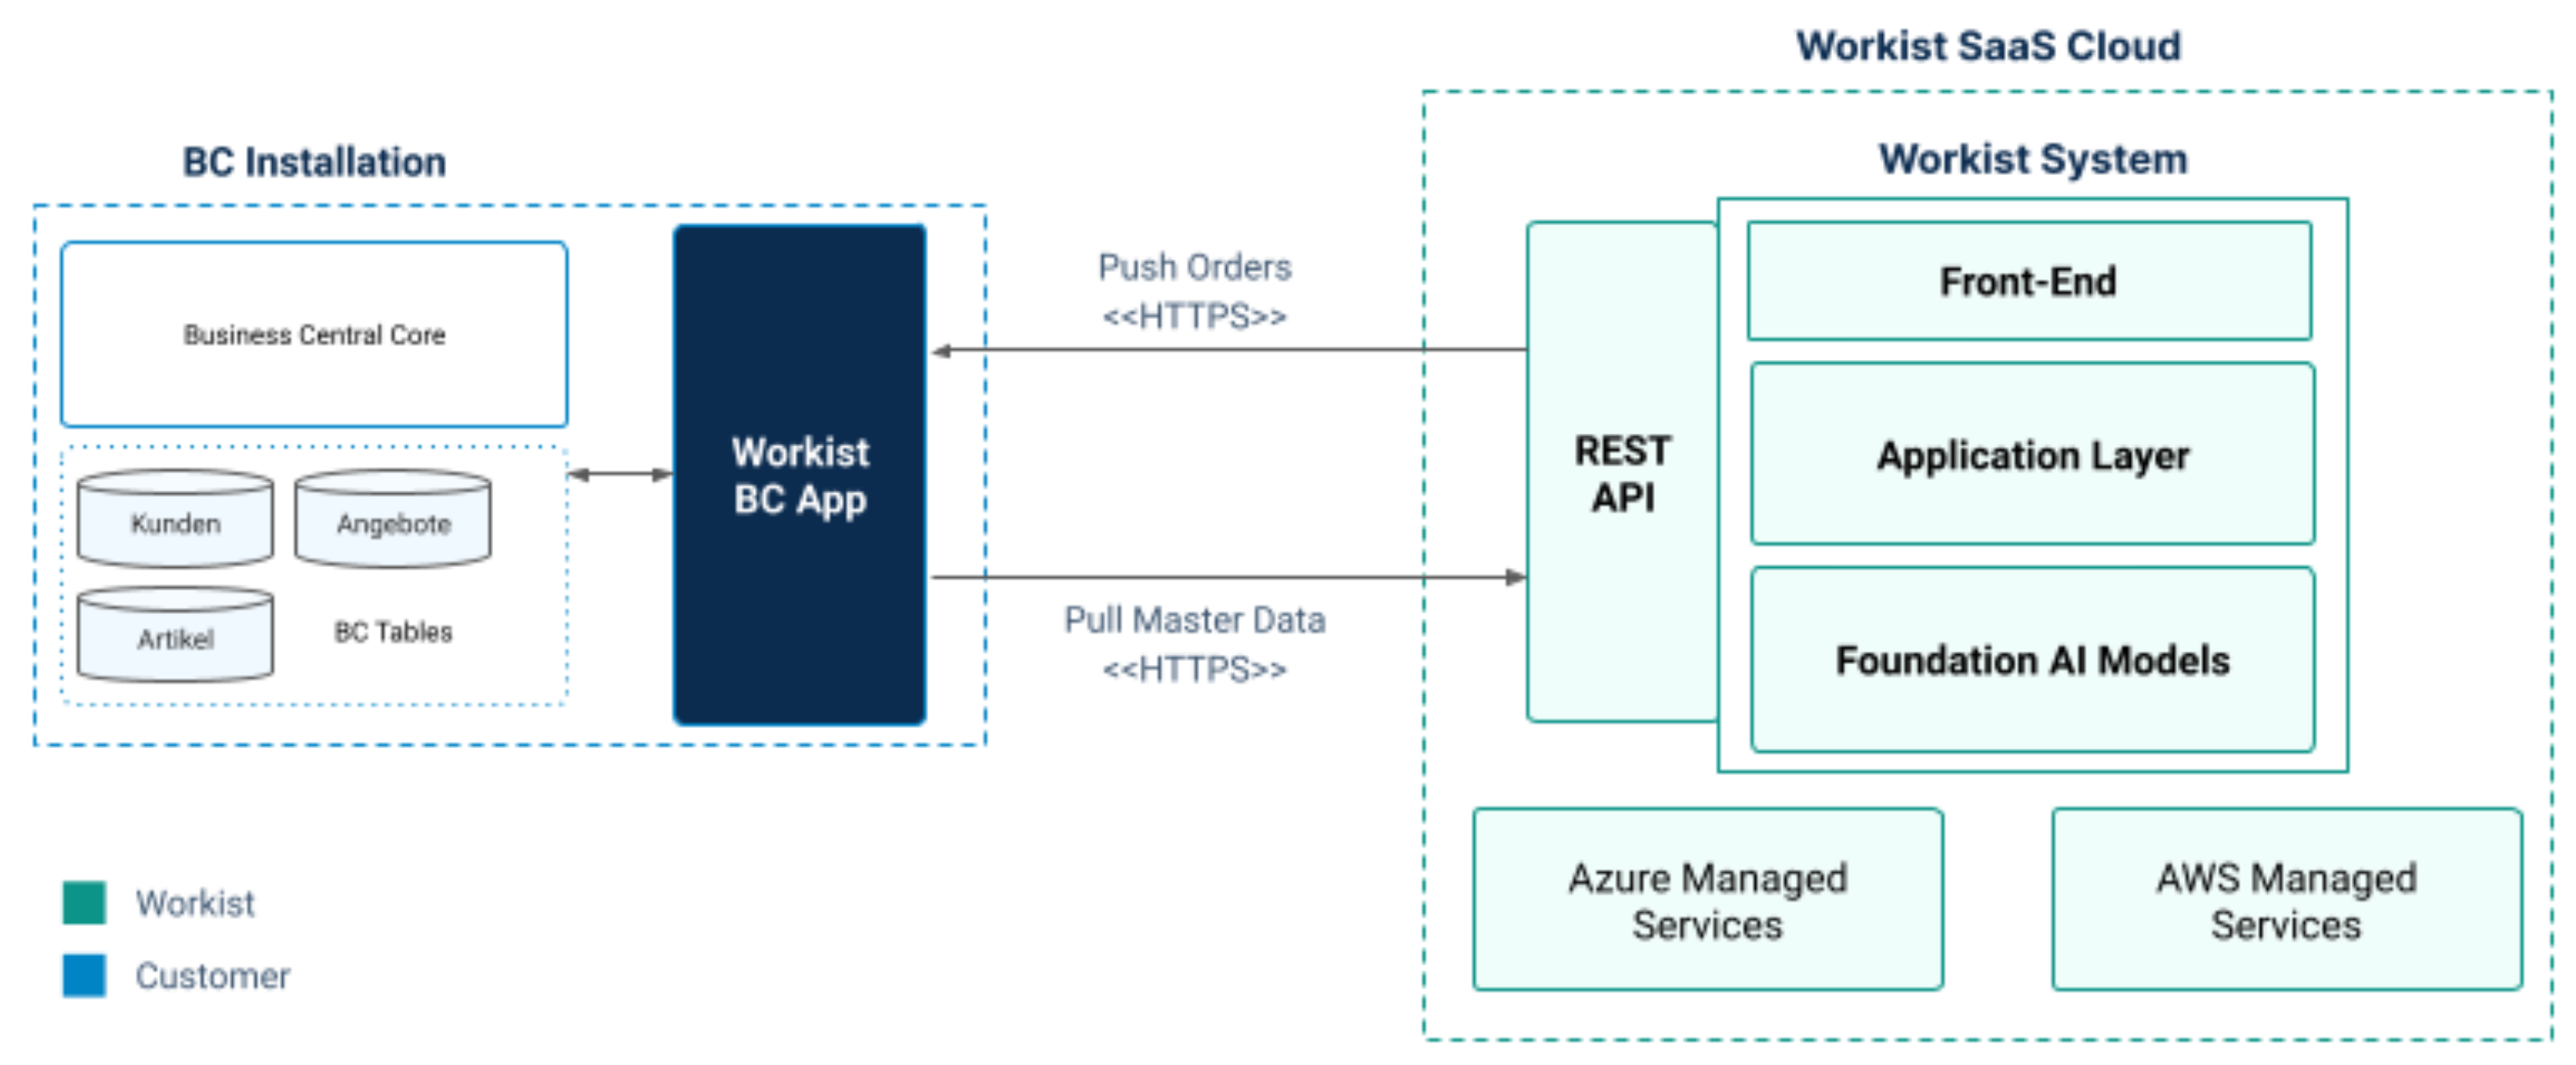
- The app is installed as a PTE in your Business Central.
- The master data to be synchronized is selected in the app and transferred to Workist via a REST API — by default once a day (nightly job, configurable).
- The app regularly checks whether completed documents are available in Workist and imports them via the REST API.
- To minimize system load, the required master data is collected in buffer tables in your Business Central system before being transferred to Workist.
- The app keeps API logs that can be used to analyze error messages.
- After a sales order has been created in Business Central, the Business Central document number is reported back to Workist — keeping the document traceable end to end.
Key functionalities
The Workist Integrator covers, among others, the following operations:
- Sync customers to Workist
- Sync items including vendor items to Workist
- Sync customer items (item references for customers) to Workist
- Sync customer delivery addresses to Workist
- Sync purchase order lines to Workist
- Import sales orders from Workist and create them in Business Central
- Report the order creation back to Workist
- Import purchase orders from Workist
- Sync sales quotes to Workist as offer-matching master data
- Sync invoice addresses (customers' billing addresses) to Workist
All synchronization processes run as job queue entries and can be adapted to your processes (see Operation).
Compatibility and prerequisites
- Business Central 23.2 or higher (the app is built against application 23.2).
- Administrative privileges for installing the per-tenant extension.
- REST API communication (HttpClient). In sandbox environments, the option "Allow HttpClient Requests" must be enabled in the extension settings.
- An API key and the required Lookup Definition IDs — both are provided on the channel management page in Workist.
Installation
Installation is usually straightforward and typically takes only a few minutes. There are no additional costs for implementation.
Prerequisites
- You need administrative privileges in your Business Central environment.
- You receive the app package as a
*.appfile from Workist. Save this file to a local drive — network-mounted or shared drives do not work in every case.
Install the app as a per-tenant extension
- In Business Central, navigate to the "Extension Management" page.
- In the "Manage" menu, use the "Upload extension" action and select the
*.appfile you received from Workist. - Usually you deploy the app package to the current version. As the schema sync mode, always choose "Add" — unless you are explicitly asked to do otherwise.
- Accept the privacy policy and disclaimer, then click "Deploy".
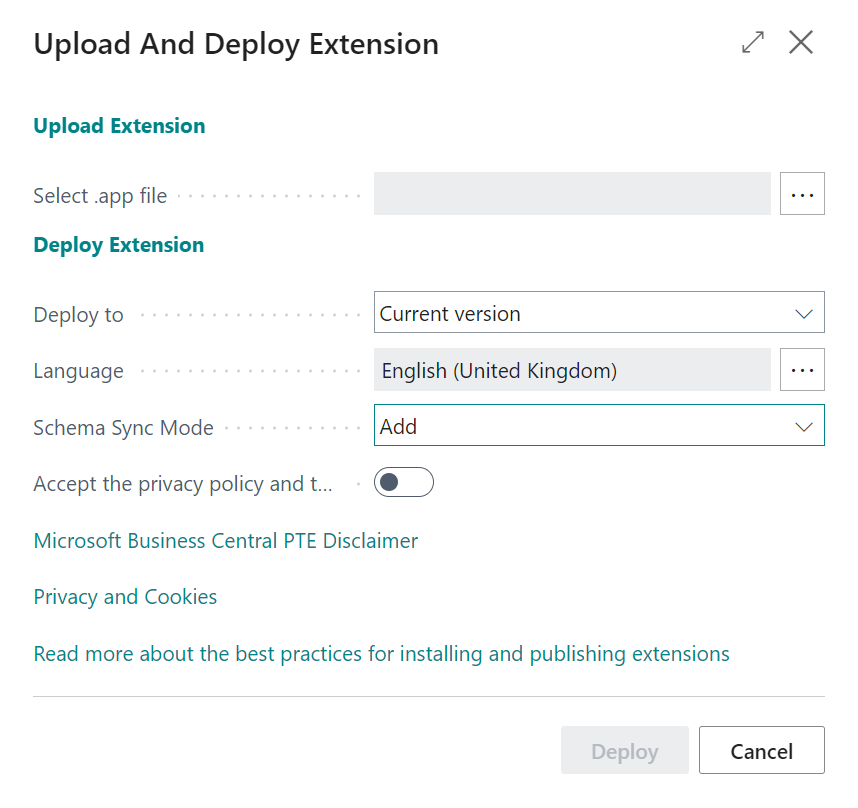
On the "Extension Installation Status" page you can follow the progress. In case of errors, you will also find detailed information here.
An extension cannot be "downgraded". On deployment, Microsoft validates the version number of the chosen *.app package against the already-installed version. The version number of the package you want to upload must be higher than the already-installed extension.
In sandbox environments you must enable the "Allow HttpClient Requests" option in the extension settings. Without it, the extension cannot communicate via the REST API.
If you encounter problems during the PTE installation whose solution is not described here — such as an object ID range already used by another extension — please contact your Workist associate.
Maintenance and updates
App updates during Business Central updates are handled by Workist. Continuous troubleshooting and ongoing platform development are included in your Workist package.
Configuration
Before you can use the Workist Integrator, you have to set it up. You will find the required information on the channel management page in Workist.
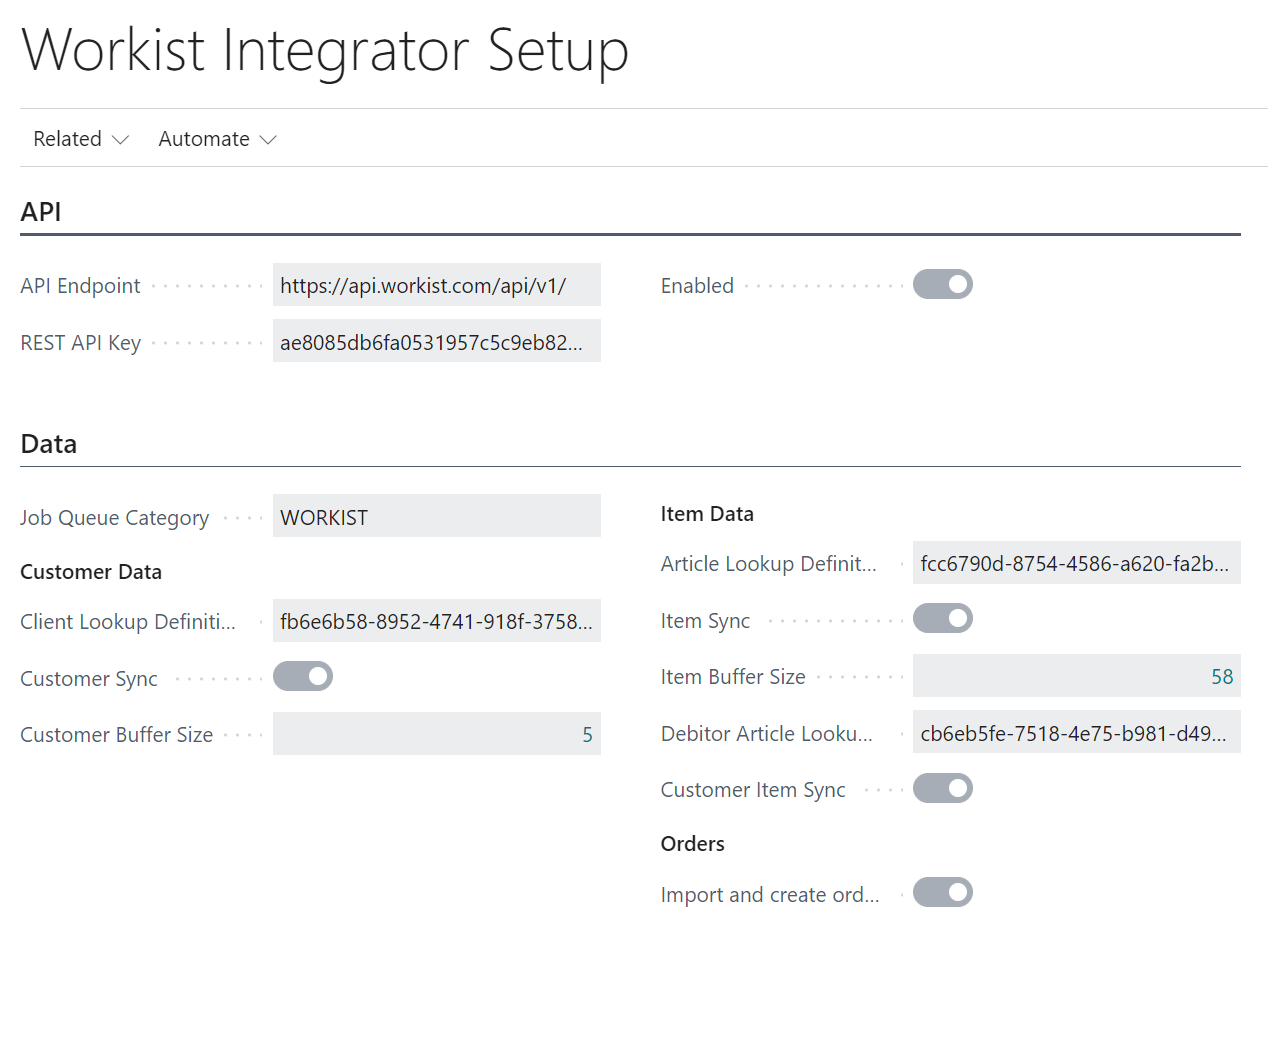
In Business Central, search for "Workist Integrator Setup". There you will find all relevant settings for the Workist integration.
API key and connection
The API endpoint field is for reference only; it is not editable and can only be changed by Workist via an app update.
The REST API key is the basis of all communication with the Workist API and the first setting you configure. Without the API key, none of the synchronization operations work. See Creating an API access token in the API documentation Quickstart for how to create or retrieve one, then paste it here using copy & paste.
When you enable the Workist Integrator, the API key and the connection are checked. If an error occurs, the "Enabled" status automatically switches back to off. After a successful activation, the API key can no longer be changed while the connection is enabled — disable the connection first.
Job queue category
On installation, a unique job queue category is created. It separates Workist's tasks from other regularly running tasks. You can change the category for Workist's entries, but it must not be blank.
Failed task retries
Sets how often a failed task is retried. If an API task results in an error, it is repeated this number of times every 5 minutes.
API log detail level
The API log detail level controls the verbosity of logging for all API interactions between Business Central and Workist. It was introduced to address performance and storage concerns in high-volume environments, where excessive logging can quickly create millions of database entries per month and thus degrade database performance.
| Detail level | Description |
|---|---|
| None | Completely disables API logging. Use with extreme caution, as it provides no visibility into API operations or errors. |
| Errors Only (default) | Logs only HTTP errors, critical failures, and failed tasks. Recommended setting for production: essential error visibility with minimal database overhead. |
| Warnings | Additionally logs warnings such as retry attempts and non-critical issues. Useful for monitoring or investigating intermittent problems. |
| Verbose | Logs everything, including successful API calls and request/response details. Highest log volume — use only temporarily during troubleshooting or initial setup. |
Recommendations:
- Production environments: "Errors Only" for optimal performance while maintaining visibility of critical issues.
- Testing/staging environments: "Warnings" or "Verbose" to capture detailed information during testing.
- Troubleshooting: temporarily switch to "Verbose", then return to "Errors Only" once resolved.
- Initial setup: use "Verbose" during the first synchronization runs to validate the configuration, then switch to "Errors Only".
Changing the detail level takes effect immediately and applies to all subsequent API operations. Existing log entries are not affected.
Customer data
In the Customer data group you enter the Client Lookup Definition ID you received on your Workist channel management page. Once the ID is entered, you can enable the customer sync. Without the Lookup Definition ID, activation fails.
On activation, a job queue entry is created that runs the sync regularly and executes once immediately. By default it runs every 1,440 minutes (24 hours). You can adjust the interval and days manually in the job queue entries.
As with the API key, the Lookup Definition ID cannot be changed while the sync is enabled — disable it first. The Customer Buffer Size shows the number of customers synchronized in the last run.
Item data
In the Item data group you enter the Article Lookup Definition ID from your Workist channel management page and then enable the item sync. Schedule and locking rules match the customer sync (by default every 1,440 minutes, adjustable; ID only changeable while the sync is disabled). The Item Buffer Size shows the number of items synchronized in the last run.
Customer-specific items: If you want to sync customer-specific items (item references), enter the Debtor Article Lookup Definition ID and enable "Customer Item Sync". This is not a separate routine; it simply adds the customer item references to the item list used by the item sync job.
Vendor items: Items with a populated Vendor Item No. generate an additional entry during each item run. It carries the same BC item number as article_id1 and the vendor item number as article_id2, so that Workist recognizes the vendor's item identifier as an alternative lookup key. During order or invoice creation, if an incoming article_number cannot be matched to the BC item number, the integration automatically retries the lookup using the vendor item number before falling back to the item reference.
Order import
To enable the order import from Workist, switch on the "Import and create orders" option. The order import job initially runs every minute; you can adjust the job queue entry settings as needed.
When an incoming Workist order contains a quote_number, the integration automatically converts the matching sales quote into a sales order using Business Central's built-in conversion. The standard header fields (customer, address, dates, etc.) are taken from the quote. Two fields are always taken from the incoming order: the External Document No. (the customer's PO number) and "Your Reference" (the commission number) — these are expected to differ between quote and confirmed order. The auto-generated lines from the conversion are deleted and replaced with the line data from Workist. The sales quote is archived automatically according to the archiving settings in Sales & Receivables Setup.
Offer matching
In the Offer matching group you enter the Offer Matching Lookup ID from your Workist channel management page and then enable the offer sync. The job runs every 60 minutes by default (adjustable); the ID can only be changed while the sync is disabled. The Sent Offers counter shows the number of offer lines synchronized in the last run.
Invoice addresses
In the Invoice addresses group you enter the Invoice Address Lookup Definition ID from your Workist channel management page and then enable the invoice address sync (by default every 1,440 minutes, adjustable).
The sync sends all non-blocked customers to Workist's address lookup endpoint. Each customer's number (No.) is used as both partition_id (to identify the customer) and address_id1 (the address identifier) — so the customer's master data record serves directly as their invoice address. The ID can only be changed while the sync is disabled. The Sent Invoice Addresses counter shows the number of addresses synchronized in the last run.
Operation
All synchronization processes run as job queue entries under the Workist category. If you feel that a synchronization is not running as intended, the job queue entries are a good starting point for analysis. An erroneous Workist entry carries an error message directly on the job queue entry.
Manage synchronization jobs
Deactivate and activate jobs
Deactivate or activate the respective job on the "Workist Integrator Setup" page using the associated toggle buttons.
Delete deactivated jobs
A job can be deleted in the detail view. This is only possible when the job previously has the status "On Hold" ("Abwarten").
Address field splitting
Workist may merge multiple address components (e.g. street name and building number) into a single street_and_nr string of arbitrary length. The Business Central address fields are limited, however: 100 characters for the primary address line ("Address") and 50 characters for the secondary line ("Address 2").
When an address is written directly from the API response (i.e. when no BC record code or ID takes precedence), the integrator automatically splits any street_and_nr longer than 100 characters:
- Smart split at word boundary: The integrator searches backwards from position 100 for the nearest space within a 15-character window (positions 86–100). If a space is found, the split happens there — the part before goes into "Address", the part after into "Address 2" (truncated to 50 characters).
- Hard split fallback: If no space is found within the window, the string is split at exactly position 100.
- Short addresses: If
street_and_nris 100 characters or shorter, it is written to "Address" unchanged and "Address 2" is left empty.
The splitting is applied consistently across all document import processes (sales orders, RFQ/sales quotes, purchase invoices).
Ship-to address handling
When syncing orders, ship-to addresses are processed as follows:
- Address code matching: If
delivery_address.numbermatches an existing ship-to address in Business Central, the code is applied to the sales order. nameandmiscfields: Thedelivery_address.nameanddelivery_address.miscfields are always transferred to the sales order, even when an address code is used. They override the stored delivery address information — but not when they are empty in Workist.
| Workist field | BC field | Always transferred |
|---|---|---|
delivery_address.number | Ship-to Code | if a match is found |
delivery_address.name | Ship-to Contact | ✓ yes |
delivery_address.misc | Ship-to Name 2 | ✓ yes |
delivery_address.street_and_nr | Ship-to Address | if no code matches |
delivery_address.postal_code | Ship-to Post Code | if no code matches |
delivery_address.city | Ship-to City | if no code matches |
Notes: Empty values from Workist are ignored — existing BC values are preserved. Addresses longer than 100 characters are split across "Address" and "Address 2" per Address field splitting. Existing orders are not affected (only new syncs).
Troubleshooting
Order import failures and retry behavior
When an order import fails in Business Central (e.g. due to validation errors, missing master data, or system issues), the Workist Integrator attempts to notify Workist by marking the order as FAILED via the API endpoint /orders/{id}/mark_imported.
- Automatic retry: The integration retries the PUT request up to five times if the first attempt fails. Delays use linear backoff (1 s, 2 s, 3 s, 4 s); maximum additional time approximately 10 seconds per failed order.
- Retry triggers: HTTP errors from the Workist API (4xx, 5xx), network errors or timeouts, and temporary API unavailability.
- Successful responses: If Workist responds with a success status (2xx), the order is immediately marked
FAILED, no retry occurs, and a success entry is created in the API log.
If all retries are exhausted after five attempts:
- Status in Workist: The order remains in Workist's import queue (
imported=false,import_failed=false). - Logging: A critical error is created in the Business Central API log (
CRITICAL: Failed to mark order [Order ID] as FAILED after 5 attempts.). - Consequence: The order is fetched again in subsequent synchronization runs (every minute by default), which can create many log entries.
- Required action: Manual intervention is necessary.
Workist API log
You will find detailed error information on the "Workist API Log" page in Business Central:
- Filter by Status = "Error" to find failed operations.
- Look for entries containing "CRITICAL" or "Failed to mark order".
- Check the HTTP status code and Response fields for detailed error information.
- Use the Task Entry No. to correlate errors with specific synchronization runs.
Recommendations
- Monitor the API log regularly (daily or weekly) to catch stuck orders early, before they create excessive log entries.
- Investigate the root cause: Determine from the Business Central logs why the order import originally failed.
- Manual resolution options: Fix the order data in Workist and reset its import status; mark the order as imported directly in Workist; correct master data issues in Business Central (missing customers, items, etc.); contact Workist support if API connectivity issues persist.
- Adjust the order import job interval if repeated failures occur.
Technical reference
Permissions
The Workist Integrator ships with a single permission set. It includes RMID/X permissions on all objects of the app. For more granular permissions, you need to create a custom permission set. The object range of the Workist Integrator is 56000 through 56499.
Field mappings
For each process, the Workist Integrator maps the Workist API fields to specific Business Central tables and fields — with direction (incoming/outgoing), API endpoint, and affected objects. Coverage includes sales orders, RFQ/sales quotes, customers, items and customer items, delivery and invoice addresses, purchase orders, purchase order confirmations, delivery notes, and purchase invoices. A complete, field-level reference is available on request from your Workist contact.
Integration events
The Workist Integrator raises numerous integration events that let developers hook their own business logic into the import and synchronization processes — for the sales order, delivery note, purchase invoice, and RFQ imports, as well as job queue and API task handling (e.g. OnBeforeFinalizeSalesHeader or OnAfterFinalizeSalesLine). The full list with AL code samples is available on request from your Workist contact.
App version
This documentation describes the Workist Integrator from version 24.0.4.68. You can obtain the full change log from your Workist associate.
Occasionally, field captions or tooltips may be incompletely or imprecisely translated. We appreciate any pointers — as well as suggestions, ideas, and bug reports. If you have any questions, reach us at support@workist.com.